Friday, April 3, 2009

Sushi Challenge 2009

The deciding factor for Sushi Challenge 2009 is going to come down to one game.

Villanova vs. UNC
Saturday Tip-Off: 7:47p CDT

Right now, Rich is leading the challenge with 770 points. Me? I'm a close second with 740 points. However I have UNC winning (possible points: 160) and Rich has them losing. So if UNC wins, I will be dining on sushi very soon. If UNC loses, I will still be eating sushi but I'll also be the one buying.
Go Carolina!!

Thursday, April 2, 2009

When you find something you like...

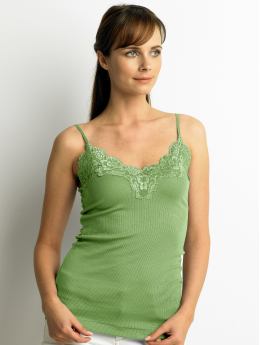
For Christmas my mom bought me the camisole above, but in blue from Banana Republic. I just love it!! I like to wear tank tops or camisoles under shirts and sweaters year-round and have casually mentioned on numerous occasions how much I love this particular design.

So, last weekend on a visit to Albertville Outlet Mall she bought me another one. This time in coral. I was so pumped! Then I learned there was an aqua one and was bummed I didn't have that one too.

Naturally I hopped in my car after work on Wednesday and drove there myself (to put distance in perspective, Albertville is 33 miles from my work and another 40 miles from my house). Thankfully my travels were not without reward. They had just received a new shipment in a range of colors: orange, purple, royal blue, brown, cream and black [cream and black were only available in XS]. I bought one of each color (minus cream and black) and even tracked down the aqua version. When you find something you like, buy one in each color. Hopefully I'll be set for a while. Though having a cream and/or black version would be nice...

*BTW - they are giving terrific discounts right now!! Each camisole was 40% off the marked price. The aqua was already clearance, but still was an additional 30% off. I also bought a sweater (30% off), pants (50% off) and a necklace (30% off) and because I am a loyal card-holder I received an additional 25% off my entire purchase. My amount saved was $40 more than what I spent! Amazing!!

Wednesday, April 1, 2009

Kettlebell Class III

I really wanted to create a post about my third Kettlebell class, but didn't write it right away and now I'm forgetting things. So I'm only going to post about part of our class, the warm-up. Next week I will document the class in a more timely fashion; I want to recall the order of our moves so hopefully I can repeat it later.

Warm-up:
Around the Body:
while standing, we swung a kettlebell around our body, trying to remain standing straight up and down. [change directions] (This uses your core among other areas, I'm sure)
Figure 8: Squat position, create a figure 8 between your legs (kind of like a Globetrotter, but w/o dribbling) [change directions]
Halo (okay this is not the correct name, but I thought halo was appropriate): Lift Kettlebell above the head and move in a circle above your head, like a halo [change directions]
Two-handed Swing: Complete 25 two-handed swings. Take break, repeat.*
*I realize this doesn't sound like a lot of work, but it definitely gets the heart pumping!!

Outside of the warm-up moves mentioned above, we've learned a number of additional techniques. (I tried to find some action shots to demonstrate the motions; if I couldn't find what I wanted, I settled with links to written descriptions):
Swing: We have learned both the two and one-handed swing. We also have worked on switching arms while swinging.


Clean: Part of the instructions state, "Doing the form incorrectly will leave you with a nice bruise on the arm the next day." Uh... I have bruises.

I was doing it wrong; most everyone in my class was as well. We were swinging the bell up to clean position using an arc, when in actuality we should have been starting in swing position and pulling the bell up our torso to clean position. The action of pulling the bell vertically really reduces the momentum of the bell and thus reduces the impact on the forearm.

Snatch: Basically you start in swing position, follow with the curl path (where you pull the bell vertically up your torso), but this time swing your elbow out, straighten your arm and hold the bell above your head. [I have not, in the least, mastered this move]
High Pull: This one reminds me of starting a lawnmower. You start with the bell between your legs, then jerk your arm back bringing your elbow up to shoulder level (along with the bell). Then punch the bell back down to the starting position.

We've also done a bunch of plank formations.
Standard Plank: (starting push-up position) on either the floor or using the kettlebells.
Plank and Row: Get into plank formation using two kettlebells, lift one kettlebell to row position and set down. Repeat with the other hand.
Plank, Row, Walk: We did the same movements as the plank and row, except when we set the bell down, we set it out further out so we had to pull our body to that position. (Imagine a military forearm crawl, but with bells not your forearm.)
Side Plank (w/ leg lift): Here we got into standard side plank position and were asked to lift one arm into the air along with one leg

Our second to last routine was 10 repetitions of a swing followed by a high-pull and then a snatch (each trio counted as 1 rep). The trifecta was then repeated for the other arm. This was probably my favorite, but intense!! Our cool-down was the plank, row, walk.

All photos and instructions are borrowed from other websites. I assume they have the copyright for these, I do not claim ownership of any of their information or images. (Except for the bruises; those are all mine.)

Tuesday, March 31, 2009

Craft # 3 - Envelopes (and cards)

This month I was inspired to make my own envelopes complete with liners and because I needed to put something into the envelopes, I ended up making cards too. Why envelopes? I have no idea, but I was motivated so I made them.

I started by buying some fancy paper and chose different colors and patterns for the envelope vs. liner, both with standard weight paper. Using an envelope that I had dismantled, I traced the shape onto my desired envelope paper and cut it out. Then I folded the paper to envelope form.
Next I created my liner template. To be honest, this was kind of a crapshoot. I made my liner slightly smaller than the flap, traced it on the liner paper, cut it out, inserted it into the envelope and folded the envelope flap over the liner. Then I applied glue to the liner only where it touched the envelope flap and pressed to adhere. I also sealed the bottom flaps of the envelope. (For glue, I used a traditional glue stick.)
The cards? Well… those started out a bit rockier. I went into this with a plan to make the envelopes, but the cards came as an after thought. The first envelope I made was for my friend Krystle. I knew I wanted to make them in her wedding colors, black & white damask and fushia. I had a plan for her card, but after I made the envelope, I took a break from her project and moved on to my sister in law. Her birthday is also in March and her card needed to get in the mail - so I finished her envelope and made the card on the spot. Judge for yourself, but I know it's ugly.
After the ugly card, I knew I needed to invest more time to make this project. And since I was working on these on a week night, I waited until the weekend to do the rest. By the time Saturday rolled around I had given my card dilemma more thought and had something in mind for the others. Since I had left off with Krystle's card, I finished that one first.
The creative process for the rest of the envelopes, liners and cards went very smoothly.

In all I made 7 envelope/liner/card combos. I mailed 3, hand delivered 3 and hid one. (The one not in the photo is my sister-in-law's card. As I mentioned, that one had to get in the mail!)

My favorite "delivery" was the card for my husband. He is out of town again this week. Being the sneaky wife I am, I hid the card in his packed pajama shorts for him to find when he got to his hotel. From the sounds of the text he sent after the card's discovery, it made him happy which, in turn, made my night.
I already have a craft in mind for April... so look for that soon!!

March Craft

It's done and it's coming!! I have a few loose ends to tie up and then I will post about it! Look for the update Sunday; Saturday if I'm feeling efficient.

In the mean time, here is something to tide you over...

Monday, March 30, 2009

Dinner for One

Today after work I wanted an easy dinner idea, ideally featuring tilapia. I had taken some tilapia out of the freezer yesterday, hoping to make it later this week but when my dinner plans for tonight changed, tilapia was back in the mix.

So I headed to google in search of a tasty, fast and simple recipe. I ended up making a number of modifications to the original recipe, Easy Tilapia from All Recipes.com, so for simplicity's sake only my version is below.

Easy Tilapia
Ingredients
6 oz. Tilapia (for me, this was two fillets)
Cooking Spray (or olive oil)
1/4 t. Garlic Powder
Salt & Pepper, to taste
1/2 lemon
1/2 c. water
1 c. cherry tomatoes
3 T. capers
1 c. mushrooms
1 c. asparagus (trimmed and cut into 1" pieces)

Directions:
1. Spray a large non-stick skillet with cooking spray and place over medium heat. Place fillets in skillet and season with garlic powder, salt and pepper. Lightly sprinkle lemon juice over fillets. Cook for 3 minutes per side, or until fish flakes with fork. Flip fillet and sprinkle with more pepper and garlic powder. When both sides have cooked, transfer fillets to a plate and keep warm.
2. Add water, remaining juice from 1/2 lemon, tomatoes, mushrooms and capers to the pan. Increase heat to medium-high. Gently smash the cherry tomatoes with a spatula. Cook for 4 minutes.
3. Add fillets back to the skillet along with the asparagus. Cover and simmer for 3-4 minutes, until asparagus is tender. Transfer fillets, mushrooms, tomatoes and asparagus back to the plate.
4. Turn heat up to high to reduce sauce, takes ~2 minutes.
5. Pour sauce over the fillets. Serve immediately.

Yum! This was super flavorful and very fast. According to the official recipe, both prep and cooking time take 15 minutes each, but I felt like this was on my plate faster than that.

*If you are looking for a single skillet dish, this recipe fits the bill. You do have to transfer it out of the skillet to a plate, but later I just used that one as my dinner plate. After all, I was the only one eating. :)

Sunday, March 29, 2009

Ranunculus Experiment

This weekend I decided to experiment with the color settings on my camera by taking photos of the Ranunculus we bought.

I took four photos with four different settings. What do you think? Can you see a difference?